




Green-screen production involves using a green or blue background to isolate the foreground elements and give the illusion that they are part of another scene. AI video generation enhances these capabilities by leveraging visual cues for composition, movement, and atmosphere. Dreamina AI provides Seedance 2.5’s reference-to-video (R2V) features for reference-guided scene generation. Some examples are images, videos, green-screen footage, and white-model references. But reference-guided generation is not a traditional chroma-key compositing method—it uses clear instructions and appropriate references to guide scenes, but not to the pixel level.
Understand the Role of Green-Screen References in AI Video
Green screen footage usually has a solid green background so that foreground items can easily be separated from the background using conventional chroma-key editing. Reference AI generation is different; it uses footage to interpret and then uses that information to create a new scene. The reference-guided creation of Dreamina Seedance 2.5’s R2V features allows communication of subject positioning, movement, and spatial relationships. The quality of the reference is important since the edges may not be sharp, the subject may not be clearly visible, or the movement may be confusing, which can reduce visual guidance. The Dreamina image to video workflow can be used for creative scene direction; however, if the background of an image needs to be removed and matte cleanup is needed, then it will take some extra tools as per availability.


Prepare Green-Screen Footage for Better Scene Direction
Use clear shots of the subject and planned movement; don’t crop too much. Test to see if green clothing, reflective objects, or background obstructions impede the ability to distinguish important details. While conventional chroma-key generation is done differently, even lighting is still helpful. Then determine the expected setting, for example, a studio, landscape, future, or an illustrated world. Recognize foreground and background elements, camera shots, and placement of the subject. Identify what appearance details have to be preserved and which environmental features can be altered.
Steps to Control Every Scene with Green Screen Using Image-to-Video AI
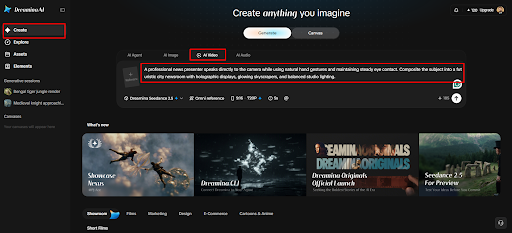
Step 1: Upload your subject and write a scene prompt
- Sign up or log in to Dreamina to start building your green screen video scenes.
- Next, open the “Create” tab from the left menu and pick the “AI video” option.
- Upload your subject photo, then enter a detailed text prompt for the scene you want.
- Add information on video elements, theme, and concept, including the exact background style you need.
Step 2: Choose a model and set your background controls
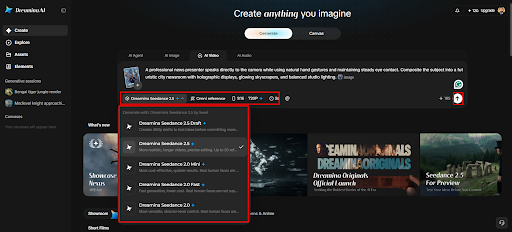
- Start by choosing a model from the options at the bottom of the dialogue box.
- Pick Dreamina Seedance 2.5, Dreamina Seedance 2.0, or Dreamina Seedance 2.0 Fast for cleaner edges.
- Dreamina Seedance 2.0 Mini and Dreamina Seedance 1.0 are also available for simpler scene setups.
- Click on “Omni reference” to guide the AI with multiple reference images for accurate results.
- Select a custom aspect ratio and a resolution from the “Aspect ratio” and “Resolution” tabs.
- Finally, click the “Generate” tab and let Dreamina begin creating your controlled green screen scene.
Step 3: Fine-tune the scene and export your video
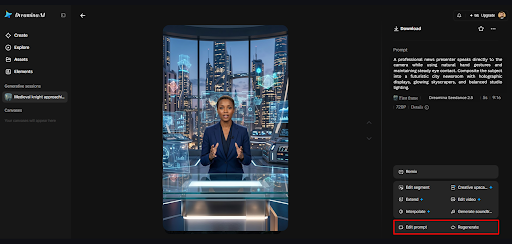
- If you don’t like the results, select “Edit prompt” or “Regenerate” to refine them.

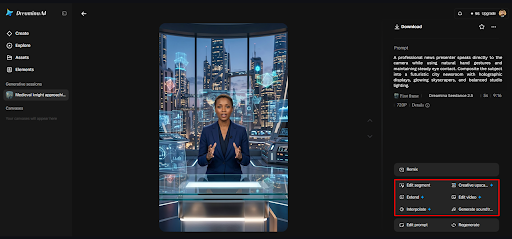
- You can also edit the generated video using the “Edit video” option to adjust backgrounds.
- Moreover, you can use “Edit segment” to change only one specific part of the scene.
- Use “Extend video” to lengthen your clip when the scene needs a few more seconds. You can also improve the video quality with “Creative upscale” for crisper edges and textures.
- Dreamina gives you complete freedom to edit every small detail of the scene your way.

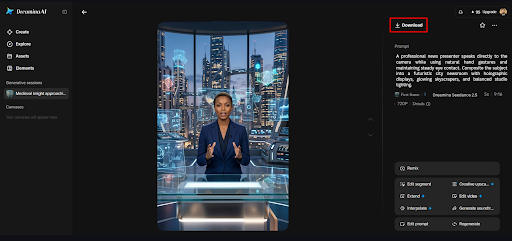
- Finally, click the “Download” tab present at the top right of the main Dreamina interface. This saves the finished video file on your local device for easy sharing or reuse.
Six Principles for Directing More Controlled Green-Screen Scenes
- Apply these principles to provide spatial relationships and minimize ambiguity in generation.
Subject placement: Indicate where the subject is in the frame and how it relates to foreground and background objects. - Movement direction: Explain the direction of the movement (walking, turning, gesturing, or stationary) that is consistent with the reference.
- Camera perspective: Specify camera angle, distance, and movement without mixing incompatible perspectives.
- Lighting continuity: Explain the direction of lighting and the atmosphere of the lighting, and then check the visual compatibility.
- Environmental interaction: How subjects interact with objects, surfaces, and the environment around them.
- Scene stability: Identify necessary features and look for anything out of the ordinary in terms of position, size, or appearance.
Direct Different Scene Types With Reference-Based Video Generation
Dreamina AI is ideal for creating visuals for virtual environments, promotions, educational content, fantasy scenes, and character-based videos. In the virtual production environment, images demonstrate atmosphere, framing, and spatial intent. When filming product scenes, it is important to have clear object references and carefully described camera movements, but there may be fine details that change from one scene to the next. Educational videos can work well to put subjects in illustrative context, and factual information should be checked. Descriptive cues and references can be used to help create imaginative settings in a fantasy or science-fiction scene. The character references can aid in recognizable appearance and positioning; facial features and wardrobe need to be inspected.
Separate Scene-Generation Problems From Traditional Compositing Problems
Conventional chroma key editing deals with green spill, transparent mattes, rough edges, and precise background removal. Alternatively, reference-based generation may lead to lighting inconsistencies, boundaries that are unstable, or interactions with the environment that are not natural. Dreamina’s reference-guided workflow isn’t meant to be a full-fledged compositing application. For projects that need careful masking, layered footage, or frame-by-frame edits, the conventional editors are still relevant. Check for hair, transparency, shadows, and edges when realistic integration is important.
Troubleshoot Scene Placement and Visual Continuity
In a floating subject, there will need to be more defined contact points with the surrounding surfaces. If the scale is incorrect, there needs to be more explicit direction in terms of distance and size. Prompts that direct lighting and atmosphere may help with lighting mismatches. Unnatural interactions require simpler actions and relationships with space. Fewer changes of environment or another generation may be required with unstable backgrounds. For inconsistent motion, comparisons of the actions generated to the reference footage are necessary. Do not rewrite any of the scene instructions unnecessarily; address each problem separately.
Review the Final Scene Before Export
Check the position of the subject, motion, edges, shadows, and background shifts prior to publishing. Check if objects are placed in sensible locations and edited sections are visually continuous. Check aspect ratio, resolution, and framing to the target delivery format. When precise chroma-key separation is still required, dedicated editing software can be used. Last but not least, download the video and view it at standard size.
Conclusion
Green-screen references convey movement, composition, and subject positioning, and traditional chroma-key tools provide the exact foreground separation. Dreamina AI offers reference-guided generation options, which help guide the creative direction of scenes without ensuring precise compositing. The refinement process is enhanced through clear prompts, appropriate references, deliberate movement, and careful inspection. The key to good scene control is first to know the reference material, and second to know the capabilities of the tool being used.